
I think many would argue that discussing MVVM is premature in part 2 of a discussion on Xamarin.Forms. My counter argument is that it is important to start out with best practices, and MVVM is the pattern of choice for Xamarin.Forms
Note, this blog post is based on my Pluralsight Course
OK, What Is MVVM?
MVVM was created (or more accurately, it evolved from previous patterns) along with the development of WPF and later, Silverlight. Projects that use XAML for the development of a User Interface are particularly good candidates for this pattern.
MVVM is nothing more (and nothing less!) than a way to create a clean separation of concerns among the various classes of your app, and to ensure that your app is testable and that dependencies are minimized or eliminated.
MVVM stands for Model – View – ViewModel. This implies a separation of your code into the domain-relevant data (the Model) and the representation of data (the View) and finally, the logic (sometimes called the business logic) of your program (the ViewModel)
Key to this division of responsibility is visibility.
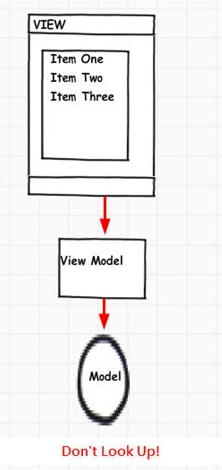 The View knows about the ViewModel, the ViewModel knows about the Model, but don’t look up!
That is, the model (data) does not need to know anything about how it is being manipulated, and certainly doesn’t need to know how it is being displayed.
The ViewModel does need to know about the Model, but isn’t concerned with how the end result of its manipulations are displayed.
The View needs to know what to ask the ViewModel for, and may need to know the structure of the Model.
None of this is new. I’ve written about this as far back as 2010, in the context of Silverlight. Not much about this pattern has changed since then.
The dirty little secret (shhh!) about MVVM is
that it isn’t that hard. Once you fully grok the division of responsibility, using the pattern is a piece of cake.
Implementation
You do not have to represent this division in your folder structure, but just about everyone does, and it is a good idea. To do so, you simply create three folders:
- Model
- View
- ViewModel
The Model folder gets the “data” of your application. More precisely, it gets the structure of the data of your application. That is, if you are modeling a book store, the Model folder might contain classes such as Book, Customer, Category, etc.
(The actual data sits in a database somewhere and to access it you would probably use the Repository pattern — a topic for another day.)
The ViewModel folder contains classes that manipulate the model data and that have public properties that the view can bind to. Data Binding is key to the MVVM pattern in Xamarin.Forms and is explained below.
The View folder will contain classes that represent the “pages” of your application. Each of these will consist of a XAML file and a XAML.cs file (as explained last week).
Note, there is a naming convention between the View and the ViewModel. Typically, for each View page (such as CustomerDisplayPage) there will be a corresponding ViewModel file with the name of that page followed by “ViewModel” (e.g., CustomerDisplayViewModel)
Data Binding
As mentioned above, data binding is absolutely key to Xamarin and to the MVVM pattern that Xamarin uses. With data binding, a control in the View is “bound” to a public property in the ViewModel. Thus, a label might be bound to a ViewModel property FullName and as the FullName property is populated from a data source, the label’s text will be changed to that value. There is a bit more complexity to data binding (such as binding incoming data back to the ViewModel) but that can wait.
The easiest way to understand Data Binding (and MVVM) is to see them in action. Let’s create an incredibly simple demonstration program.
The Demo
Start a new application as described in Part 1 of this series. I have named this demo MVVM Demo
Collapse the Android and iOS folders, we won’t be using them in this exercise. In the PCL, create folders named “Model,” “View,” and “ViewModel. Drag the file MVVMDemoPage.xaml into the View folder (it will bring its code-behind file with it).
We’re ready to go. We’ll create a very simple form that displays a name.
The Model
Let’s start with the model class. In the Model folder, create a class called Person.
 using System;
 namespace MVVMDemo.Model {
    public class Person {

       public string FirstName { get; set; }
       public string LastName{ get; set; }
       public string email{ get; set; }

    }
 }
The ViewModel
Next, we’ll set up our “business logic” in the ViewModel, and expose a property FullName. In the ViewModel folder create a class named MVVMDemoViewModel:
 using System;
 using MVVMDemo.Model;

 namespace MVVMDemo.ViewModel {
    public class MVVMDemoViewModel {

       public string FullName { get; }

       public MVVMDemoViewModel( Person person ) {
          FullName = $"{person.FirstName} {person.LastName}";
       }
    }
 }
The ViewModel’s constructor expects a Person, and concatenates the Person’s first and last name, placing the result in its public read-only property FullName.
The View
We turn now to the View. We’re going to do two things in the View: create the user interface, and make the connection to the ViewModel.
Let’s start with the user interface, which we create in MVVMDemoPage.xaml.
 <?xml version="1.0" encoding="utf-8"?>
 <ContentPage
    xmlns="http://xamarin.com/schemas/2014/forms"
    xmlns:x="http://schemas.microsoft.com/winfx/2009/xaml"
    xmlns:local="clr-namespace:MVVMDemo"
    x:Class="MVVMDemo.MVVMDemoPage">
    <Label
       Text="{Binding FullName}"
       FontSize="40"
       VerticalOptions="Center
    HorizontalOptions="Center" />
 </ContentPage>
This is very familiar. All I’ve done is set the FontSize (to 40) and modified the text. But it is this modification that is central to databinding. Rather than providing the actual text, I’ve informed the label that its text will come from a property named FullName to which it will be bound. The syntax is as shown: you surround the binding statement with curly braces and you use the keyword Binding followed by the property you want to bind to (to which you want to bind??)
Where is that property? Aha! That is the key question. It is in the ViewModel, and we need some way of telling the view where to look for its binding. That we do with the BindingContext.
The BindingContext must be explicitly set to the ViewModel so that the Binding command knows where to find the property to bind to. You set this in the code behind for the view, thus:
 using MVVMDemo.Model;
 using MVVMDemo.ViewModel;
 using Xamarin.Forms;

 namespace MVVMDemo {
    public partial class MVVMDemoPage : ContentPage {
       MVVMDemoViewModel vm;
       Person person;

       public MVVMDemoPage() {
          InitializeComponent();
          person = new Person();
          person.FirstName = "Jesse";
          person.LastName = "Liberty";
          person.email = "jesseliberty@gmail.com";
          vm = new MVVMDemoViewModel( person );
          BindingContext = vm;
       }
    }
 }
Notice the using statement to handle the namespaces that Visual Studio creates for the classes in the various folders.
We instantiate a Person object and assign its public properties.
Next, we declare vm to be of type MVVMDemoViewModel, and we instantiate the ViewModel. Finally, we set the BindingContext to vm (the ViewModel we just instantiated).
The circle is now complete. In the view we say that we’ll bind to a property, FullName. In the code behind we say to find that field in the ViewModel (we say that by setting the BindingContext). In the ViewModel we take the two properties of the Person parameter, concatenate them, and assign them to the property FullName which is what the label binds to.
The result is that when we run the program, the full name is displayed.
 Source Code


awesome .. thanx